Capturing the perfect screenshot is both an art and a science.
Since SimPictures launched, reviewing submissions has become increasingly challenging: we strive to uphold high standards, encourage diversity, and strike that elusive balance between the two. This delicate equilibrium has sparked countless conversations—both within our team and with users—about questions like “Why was this accepted, but that one wasn’t?” and even occasional debates among our screeners over decisions and criteria.
After close collaboration with our screening team and hands‑on experience evaluating your screenshots, I’ve distilled our collective best practices and advice into a clear set of guidelines. We believe transparent communication about these standards is more important now than ever.
In this blog post, you’ll find essential tips and techniques for crafting screenshots that showcase exactly what you intend, with optimal clarity and visual appeal.
By following these recommendations, you’ll greatly improve your chances of approval. And remember: if SimPictures doesn’t accept your submission, it doesn’t mean your screenshot is “bad”—taste is always subjective!
I may update this post if I discover any mistakes or things to improve.
Best Practices
Cropping
It's essential to remove all user interface elements and on-screen text, such as frame rate counters and performance metrics. You may do this by hiding UI elements when doing a screenshot manually or using appropriate tools, as well as cropping out elements using cropper on upload, if possible.
We recommend keeping cropping in mind when taking the screenshot, not just afterwards. It’s a good practice to leave extra space around the aircraft, giving you more flexibility to adjust the cropping later.
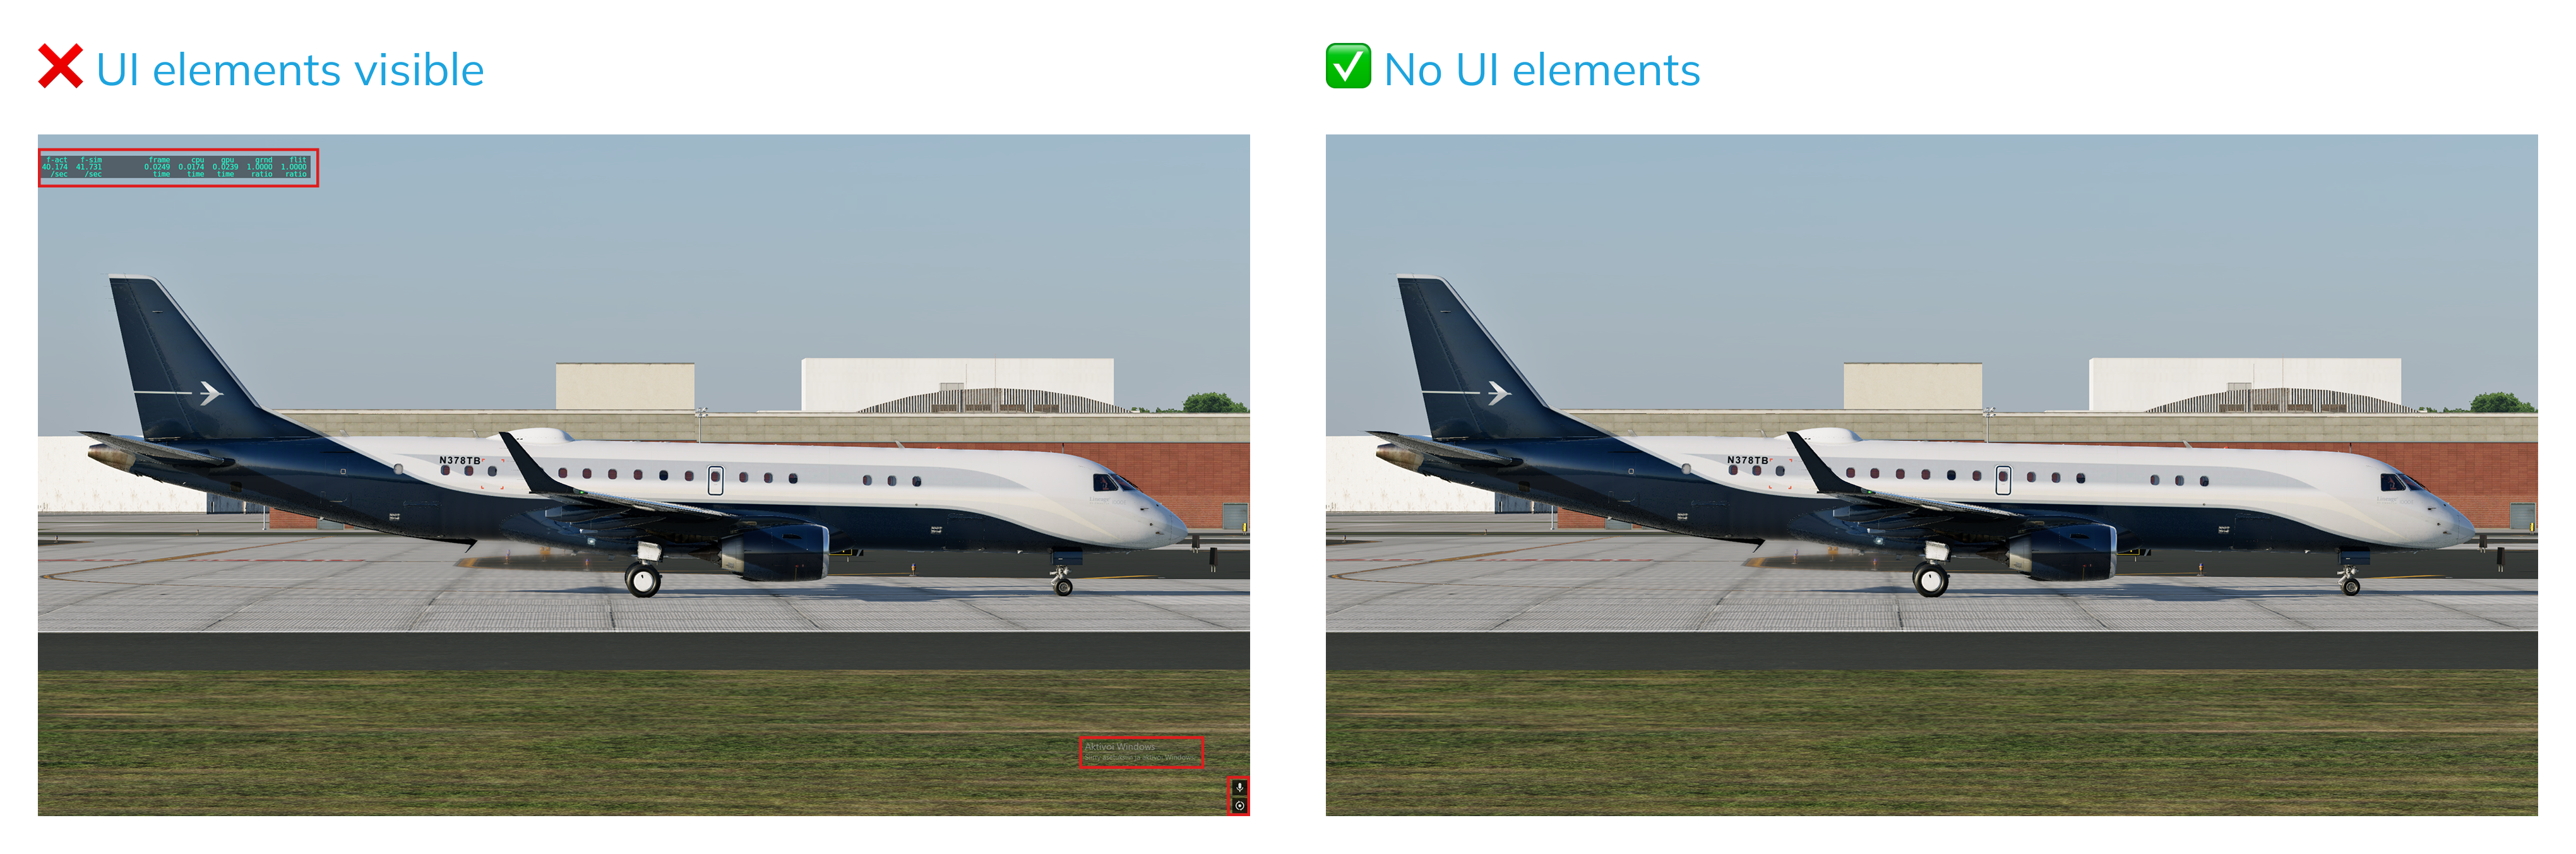
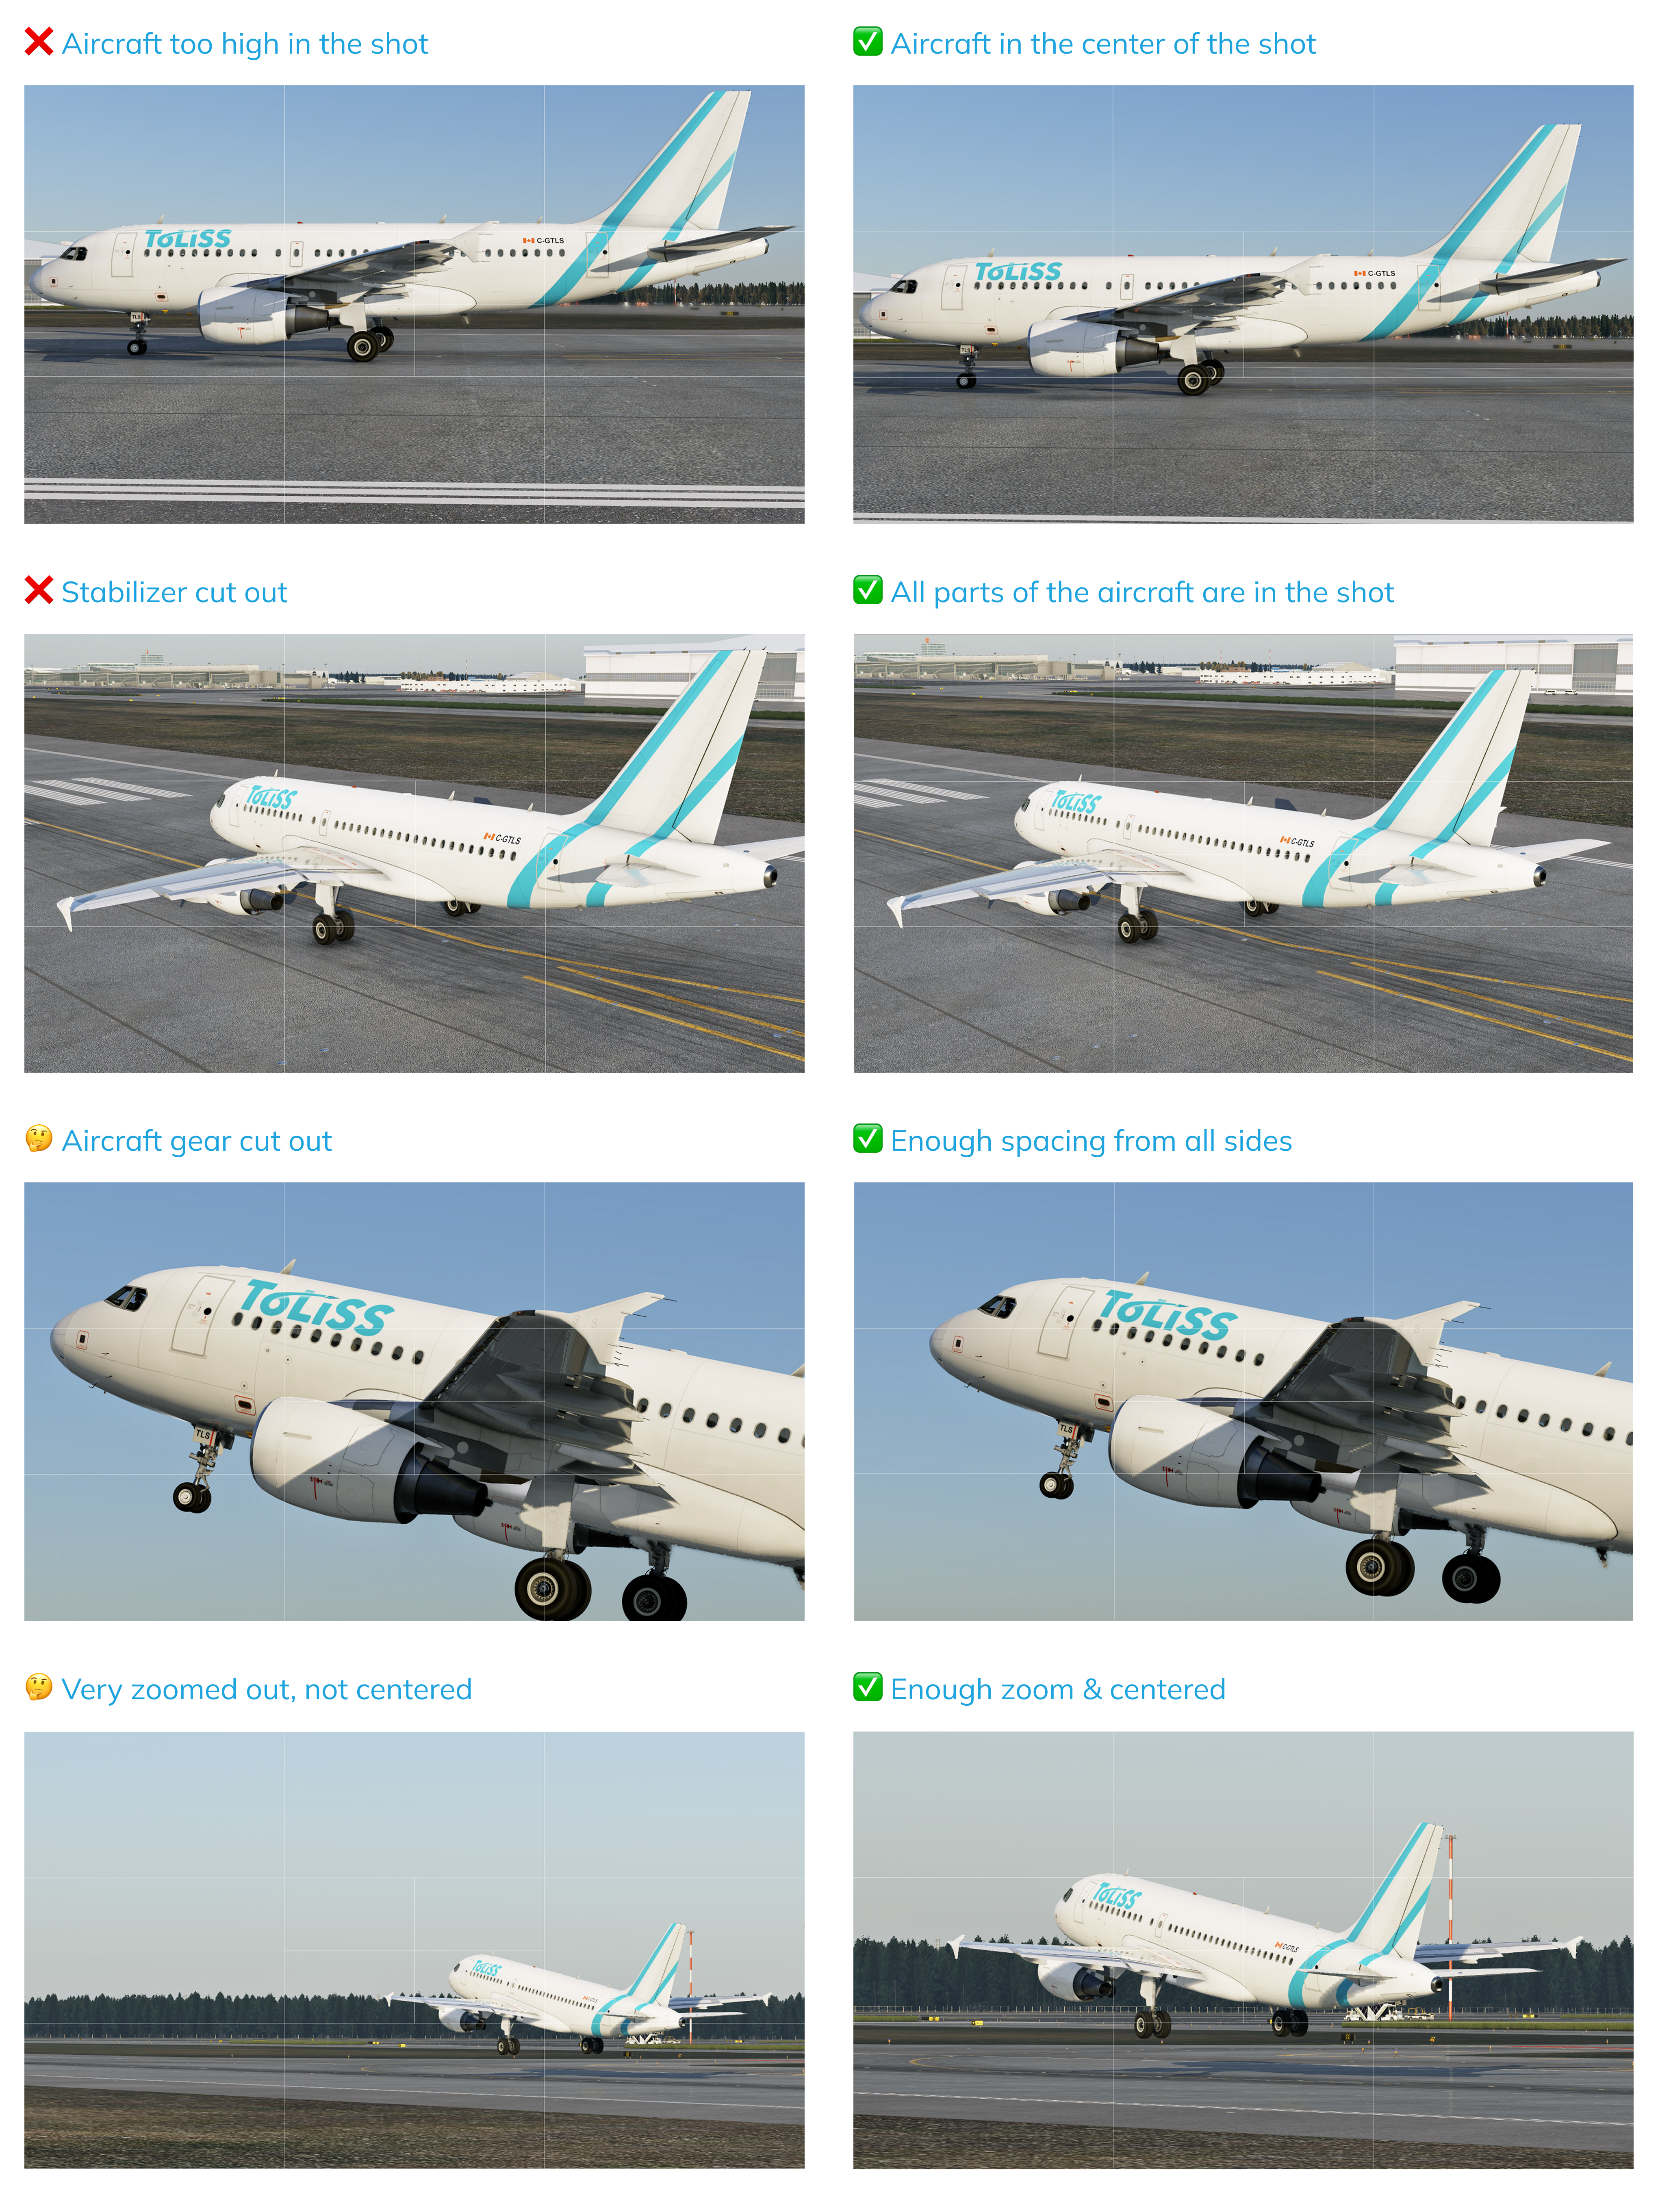
After removing UI out of the shot, ensure:
- Aircraft is centered. The best way to go is to center fuselage of the aircraft vertically, and leave space on both sides of the aircraft horizontally as well.
- The entire aircraft is visible with no parts cut off. If your screenshot does have some parts cut off, keep in mind that it would have more chance of rejection, so try to keep important parts inside the shot. If the image is visually well composed, it might be accepted.
- Equal spacing on all sides of the aircraft - picture should be cropped equally both horizontally and vertically.
- Enough, and not too much space from the edges of the screenshots.
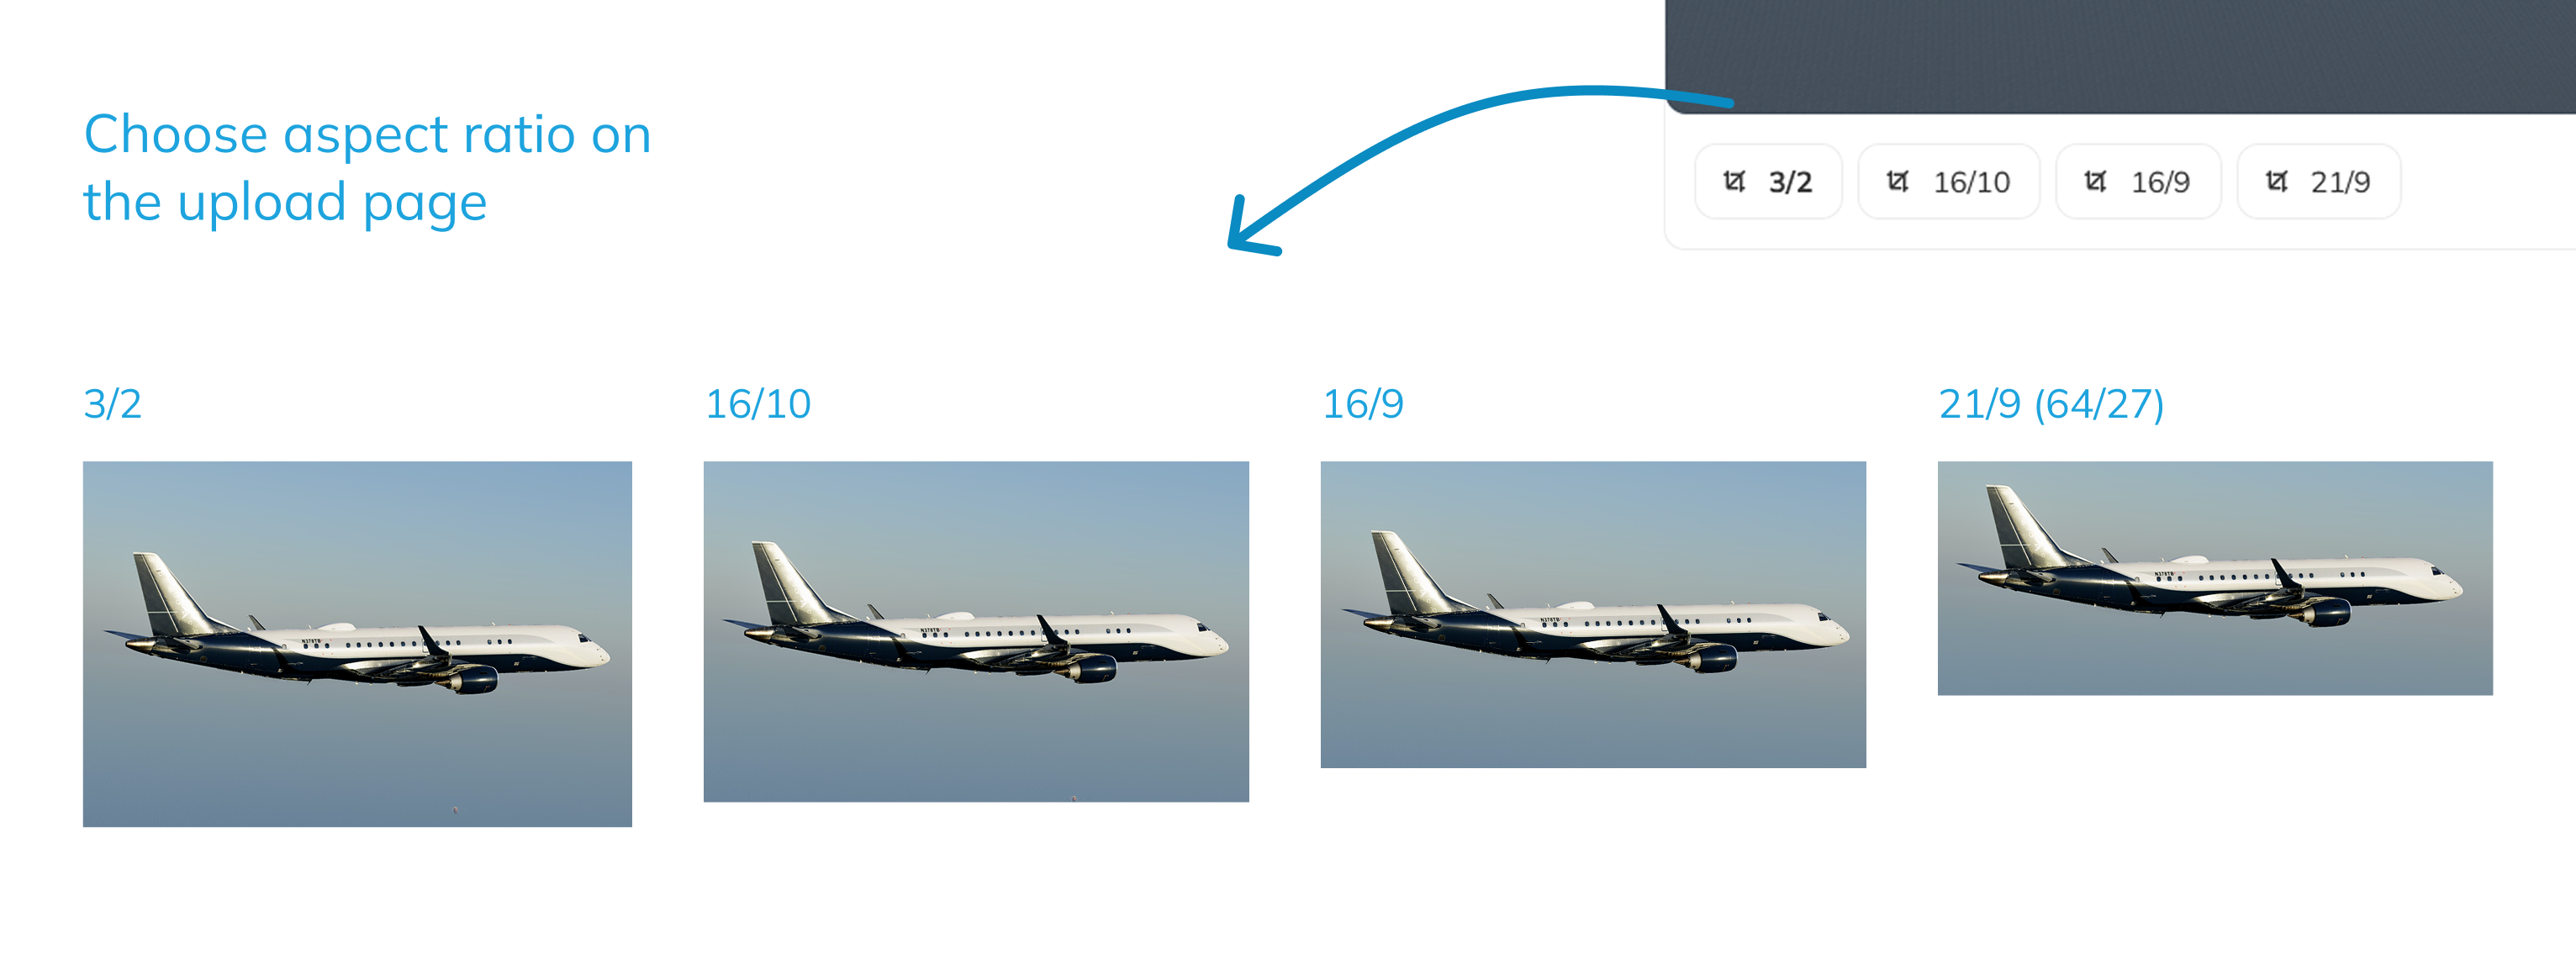
Don’t forget that you can choose from the four available aspect ratios for your benefit! These are: 21/9 (practically 64/27), 16/9, 16/10 and 3/2
Lighting & Composition
Proper lighting can make or break a screenshot.
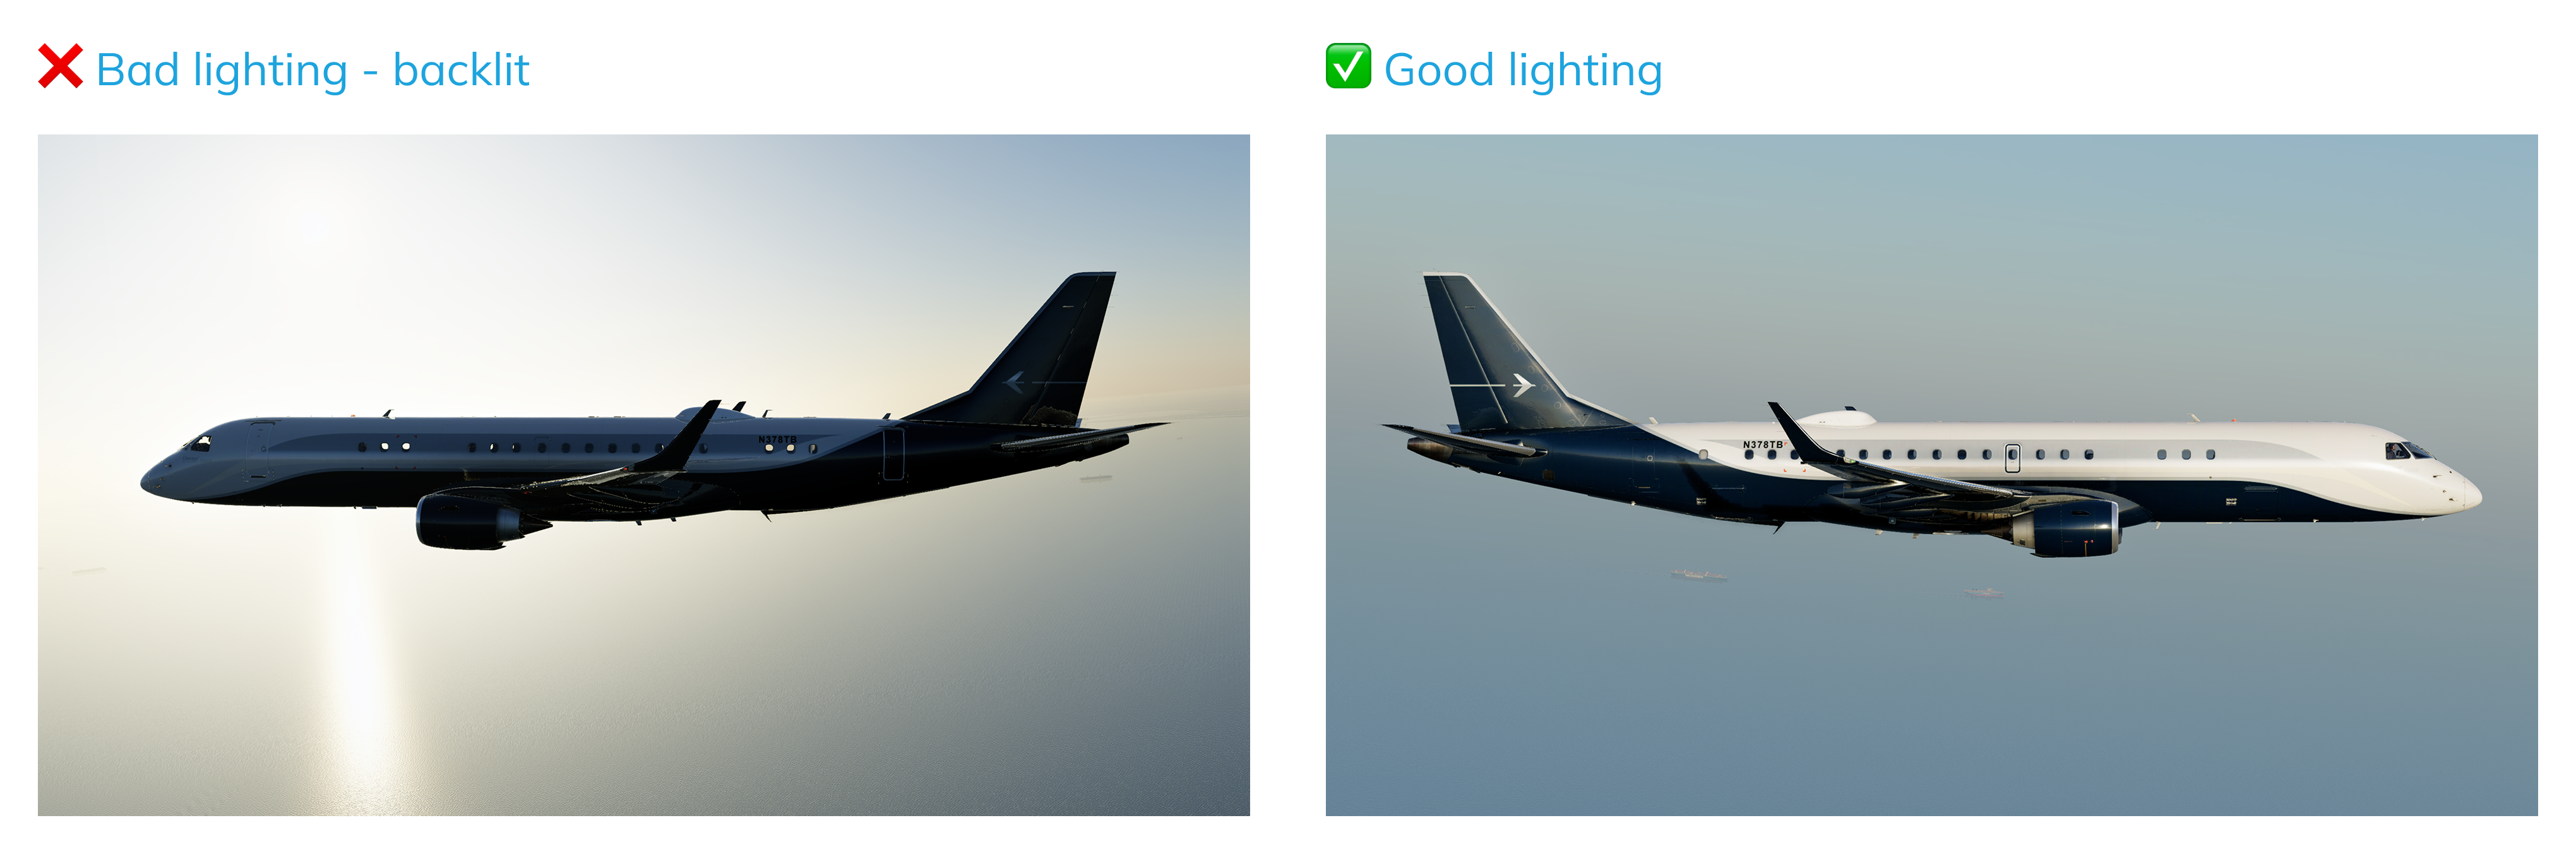
For best results, avoid taking backlit shots (where the sun is behind the aircraft) - backlit conditions create dark silhouettes and lose important detail in the shadows. So, try to position your camera so the light source illuminates the aircraft from the front - this way all of the details stand out.
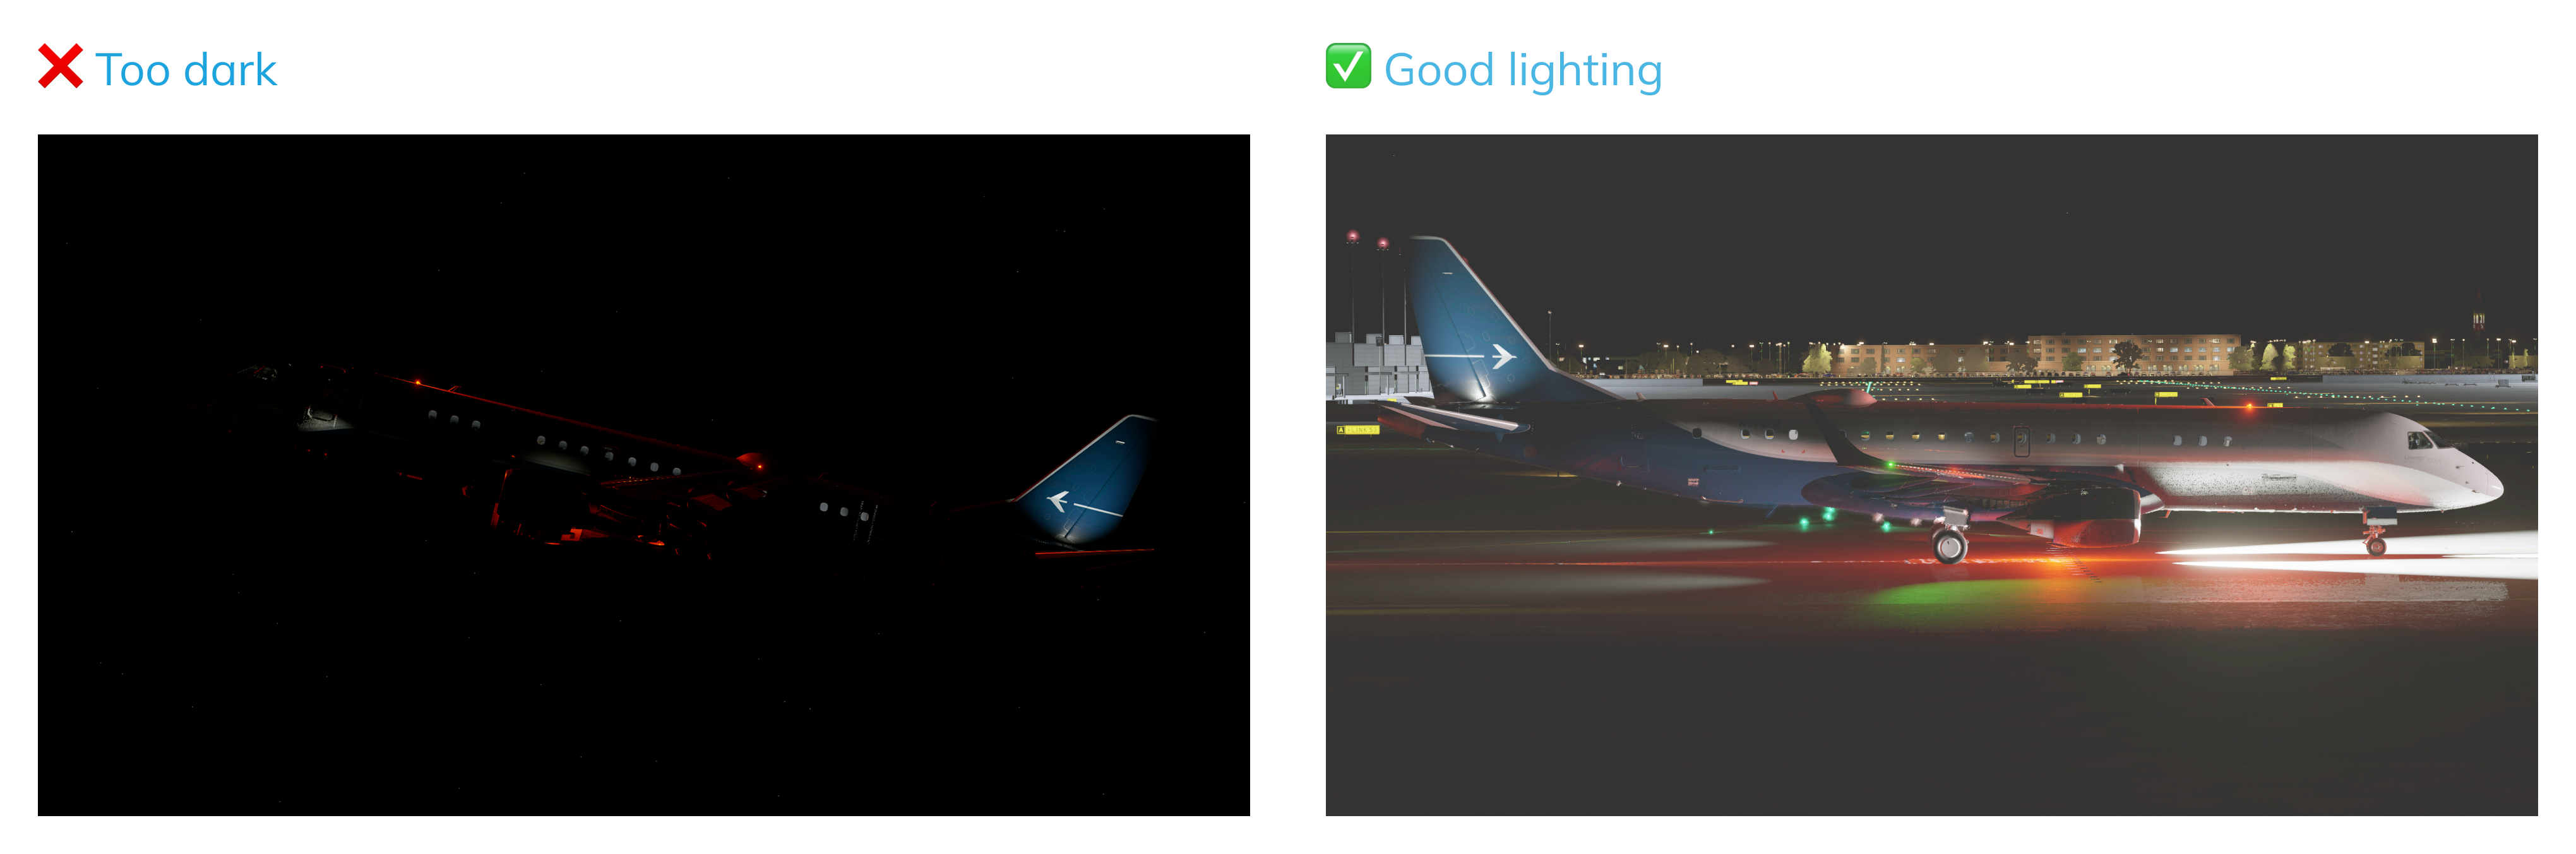
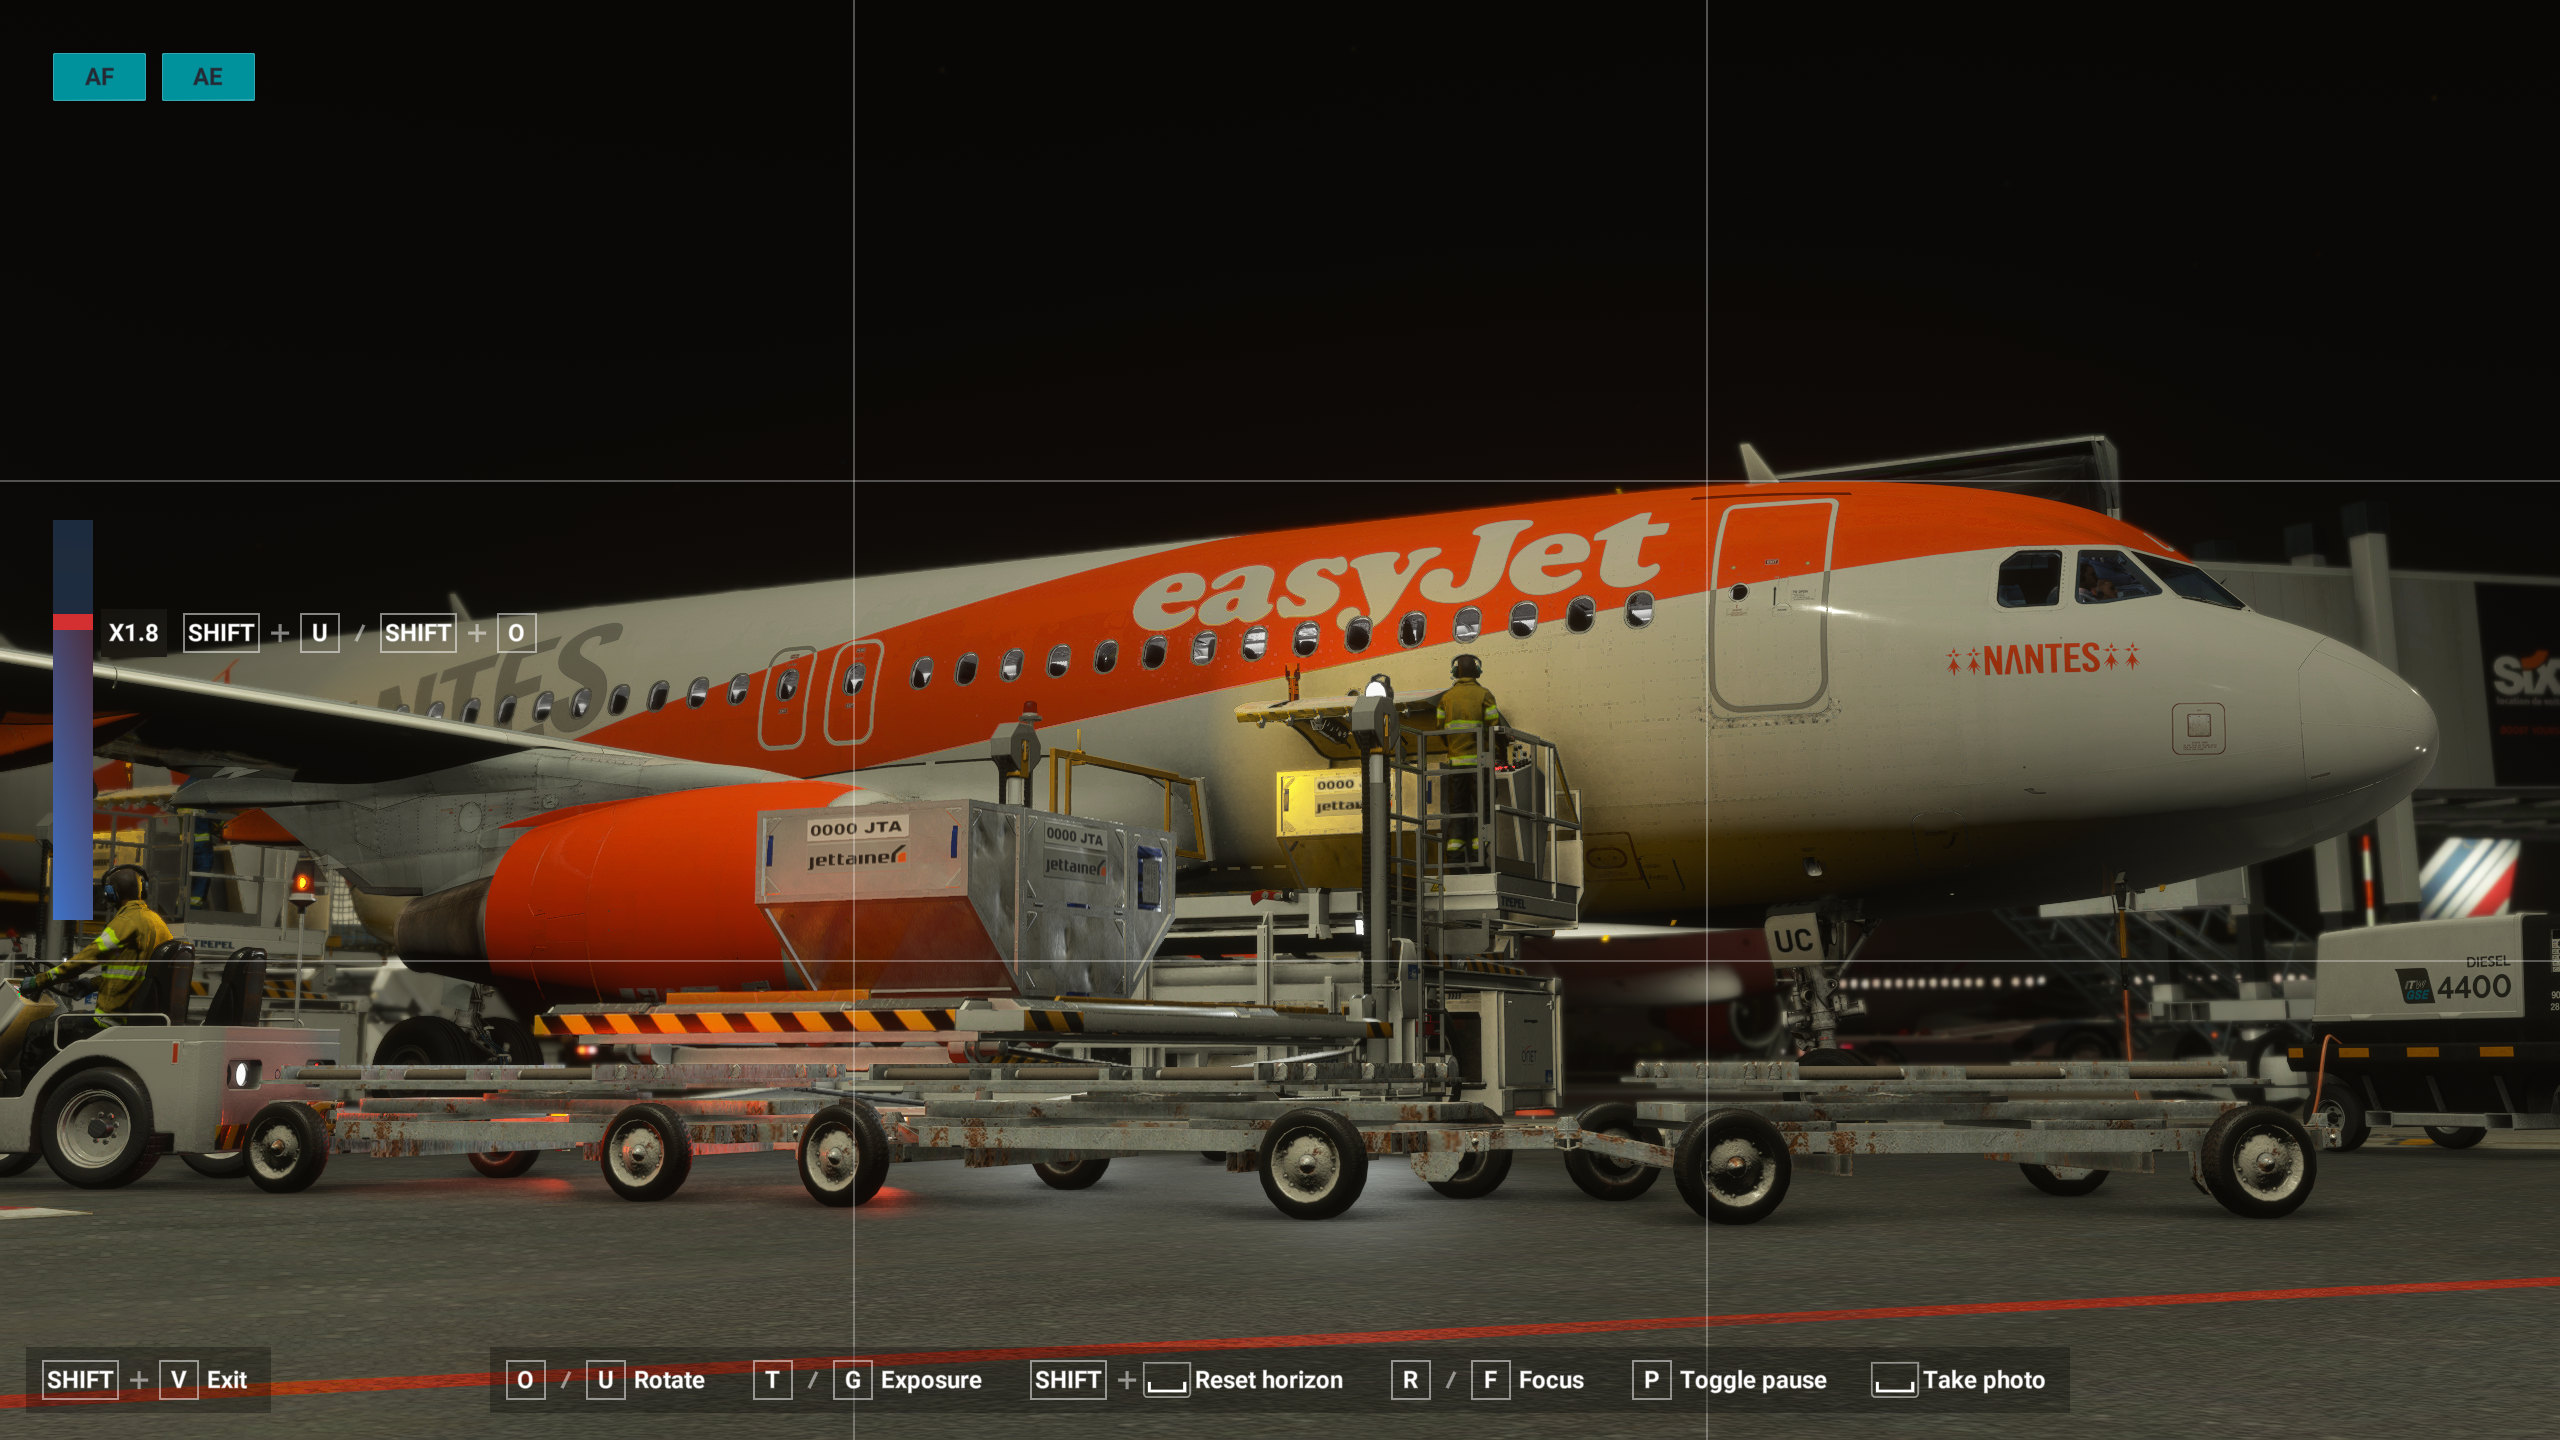
Night shots can be especially tricky. Ensure that there is enough light on the screenshot, so that details could be seen even in the light version of the website.
Scenery with bright lighting, aircraft lights, changing settings (e.g. X-Plane 12 has ability to change Exposure) or even editing your night shot may help to make your screenshot look great.
Here’s a useful composition trick: back away from the aircraft and then zoom in—this telephoto compression scales the background and can subtly alter how the aircraft’s proportions read. This effect can significantly affect the composition. For most screenshots, it is recommended to back away a bit from the aircraft for the best composition.
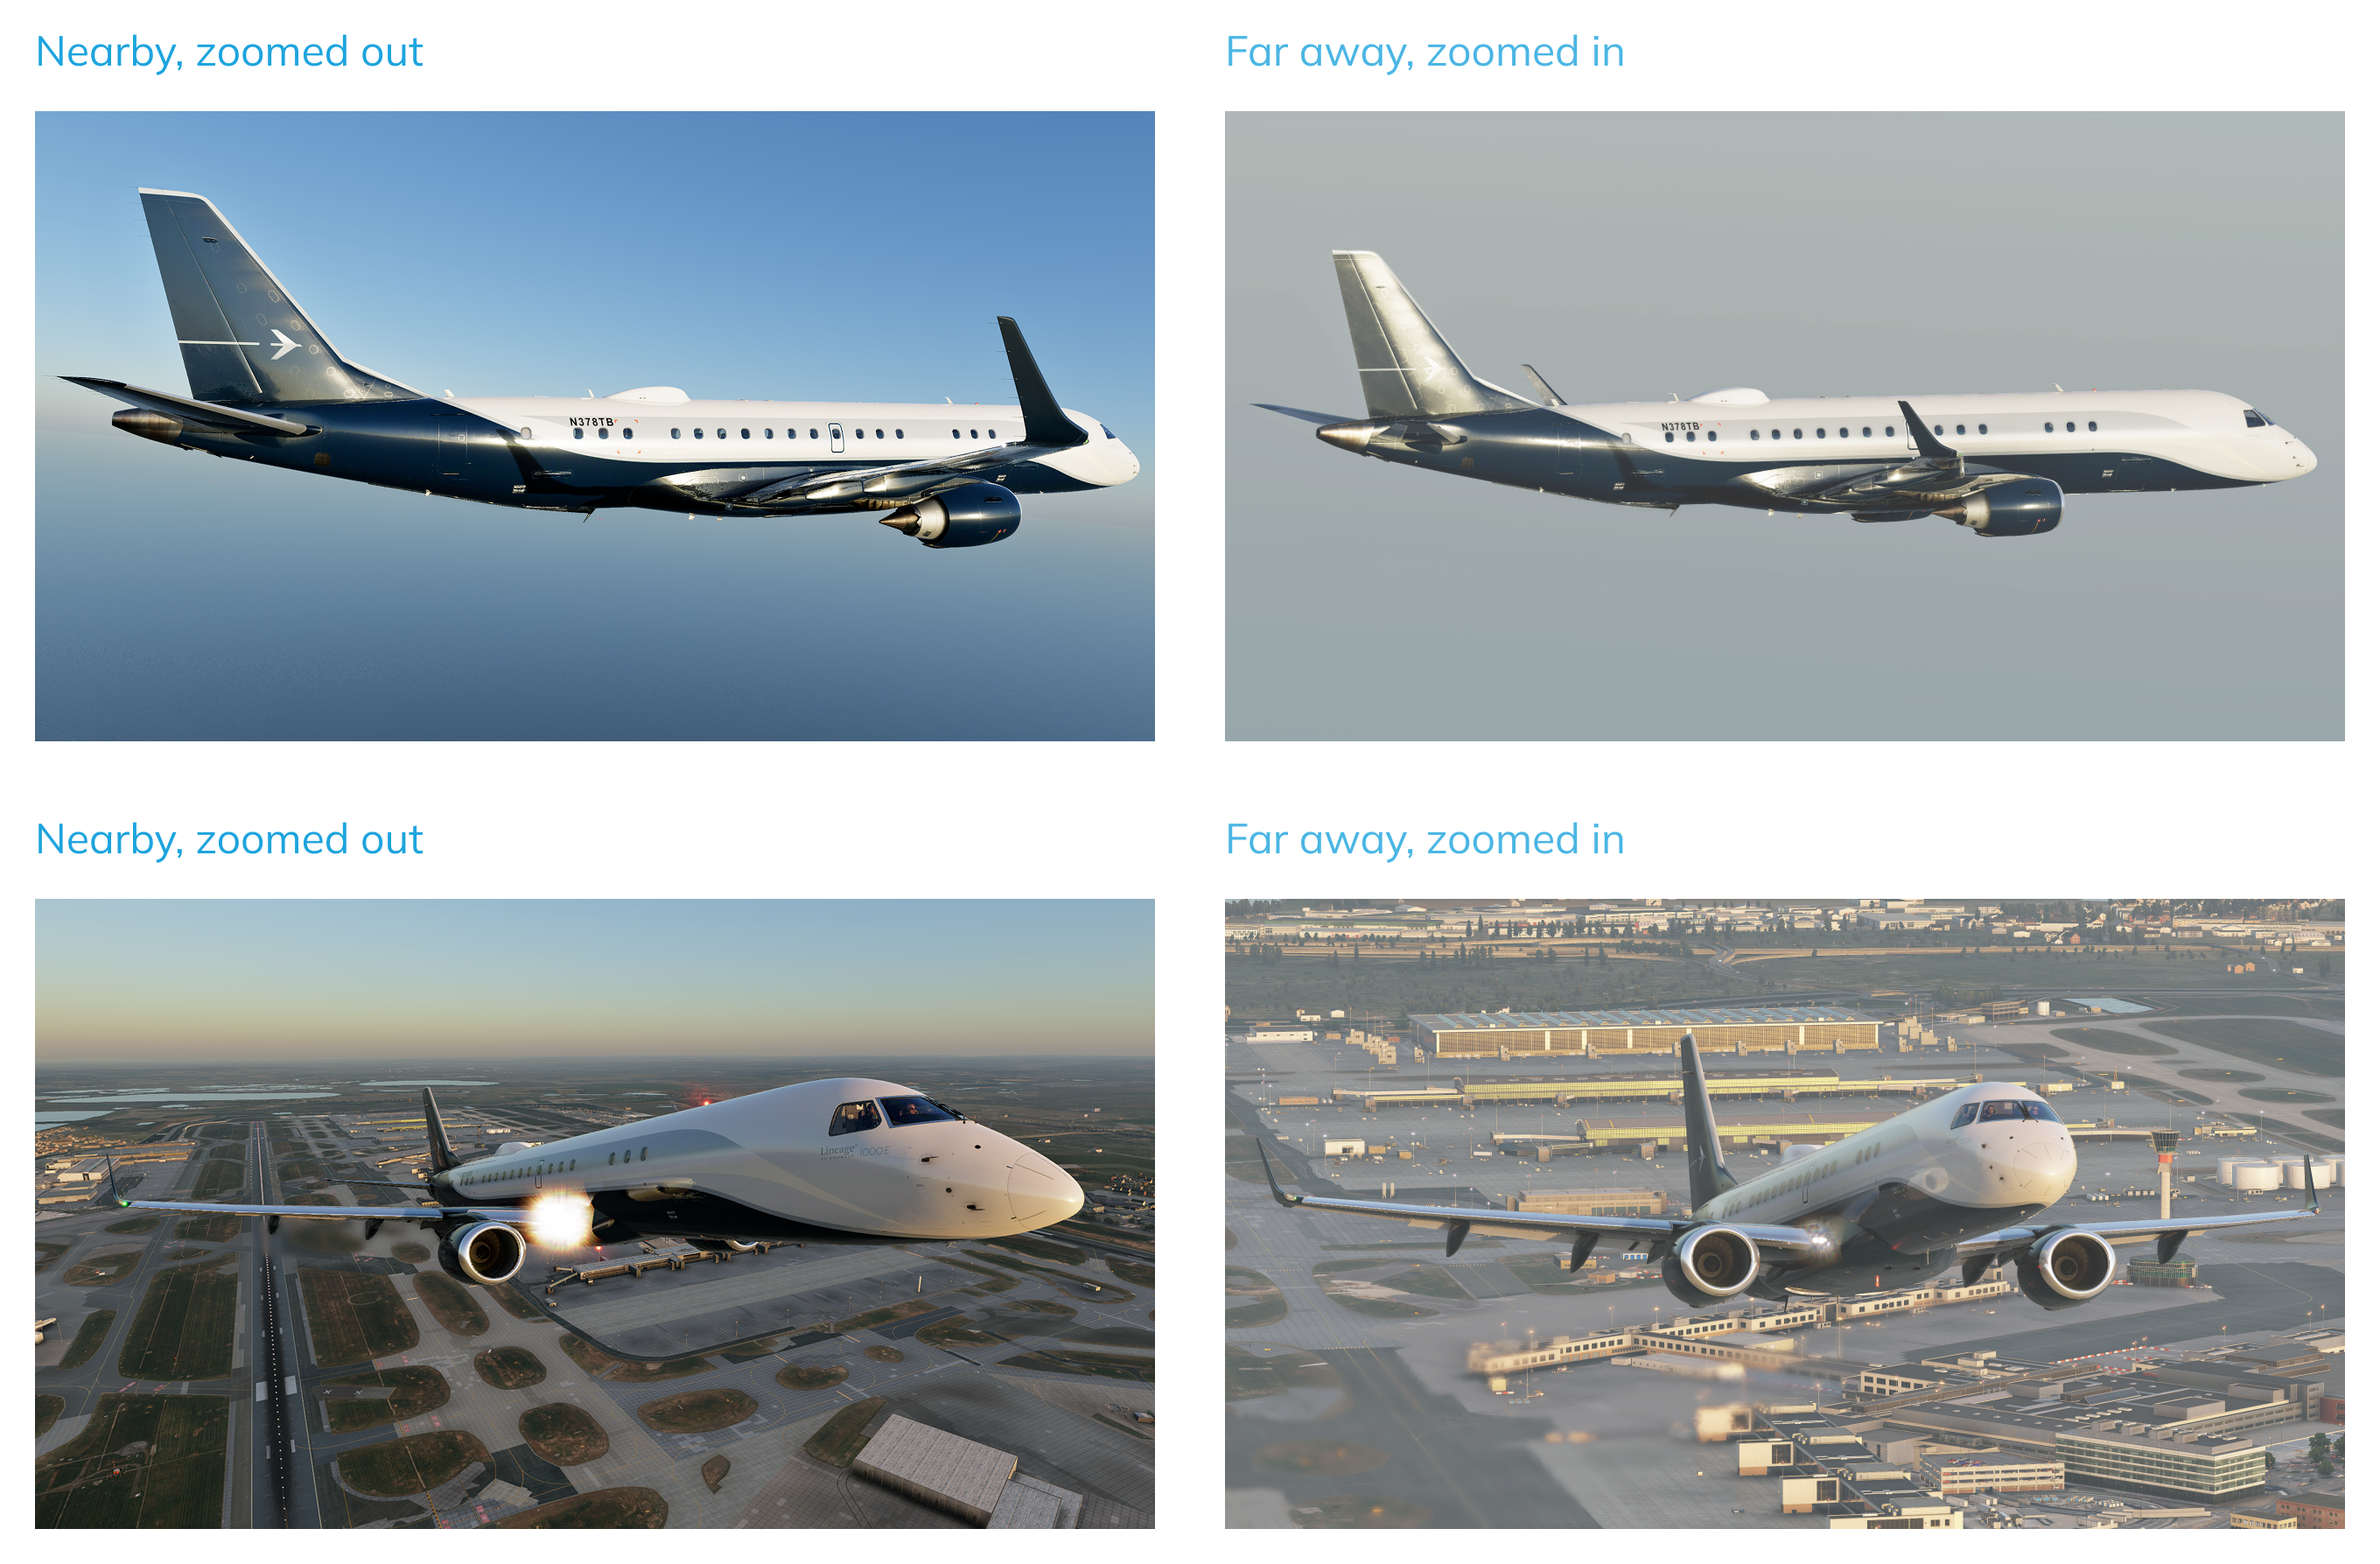
When using a telephoto lens (or zooming in), the sense of depth in the image is reduced. The distance between the subject and the background appears compressed, making them seem visually closer together. This technique can be particularly effective when you want to highlight both the foreground and background elements together as part of the composition.
On the other hand, when using a wide-angle view, you may encounter noticeable distortion — commonly known as the fisheye effect. For instance, a vertical rectangular object positioned close to the camera can appear barrel-shaped, as if its geometry is bending outward. In other words, wide angles can cause significant distortion of shapes and proportions.
It’s also useful to consider the concept of framing, often referred to in terms of "shot size" in photography and cinematography. While commonly applied to portraits, it can also be adapted for aircraft screenshots. For example, a wide (or establishing) shot shows the entire aircraft in frame, without cropping any part of it. This type of shot is ideal when you want to present the aircraft clearly and provide context within its environment.
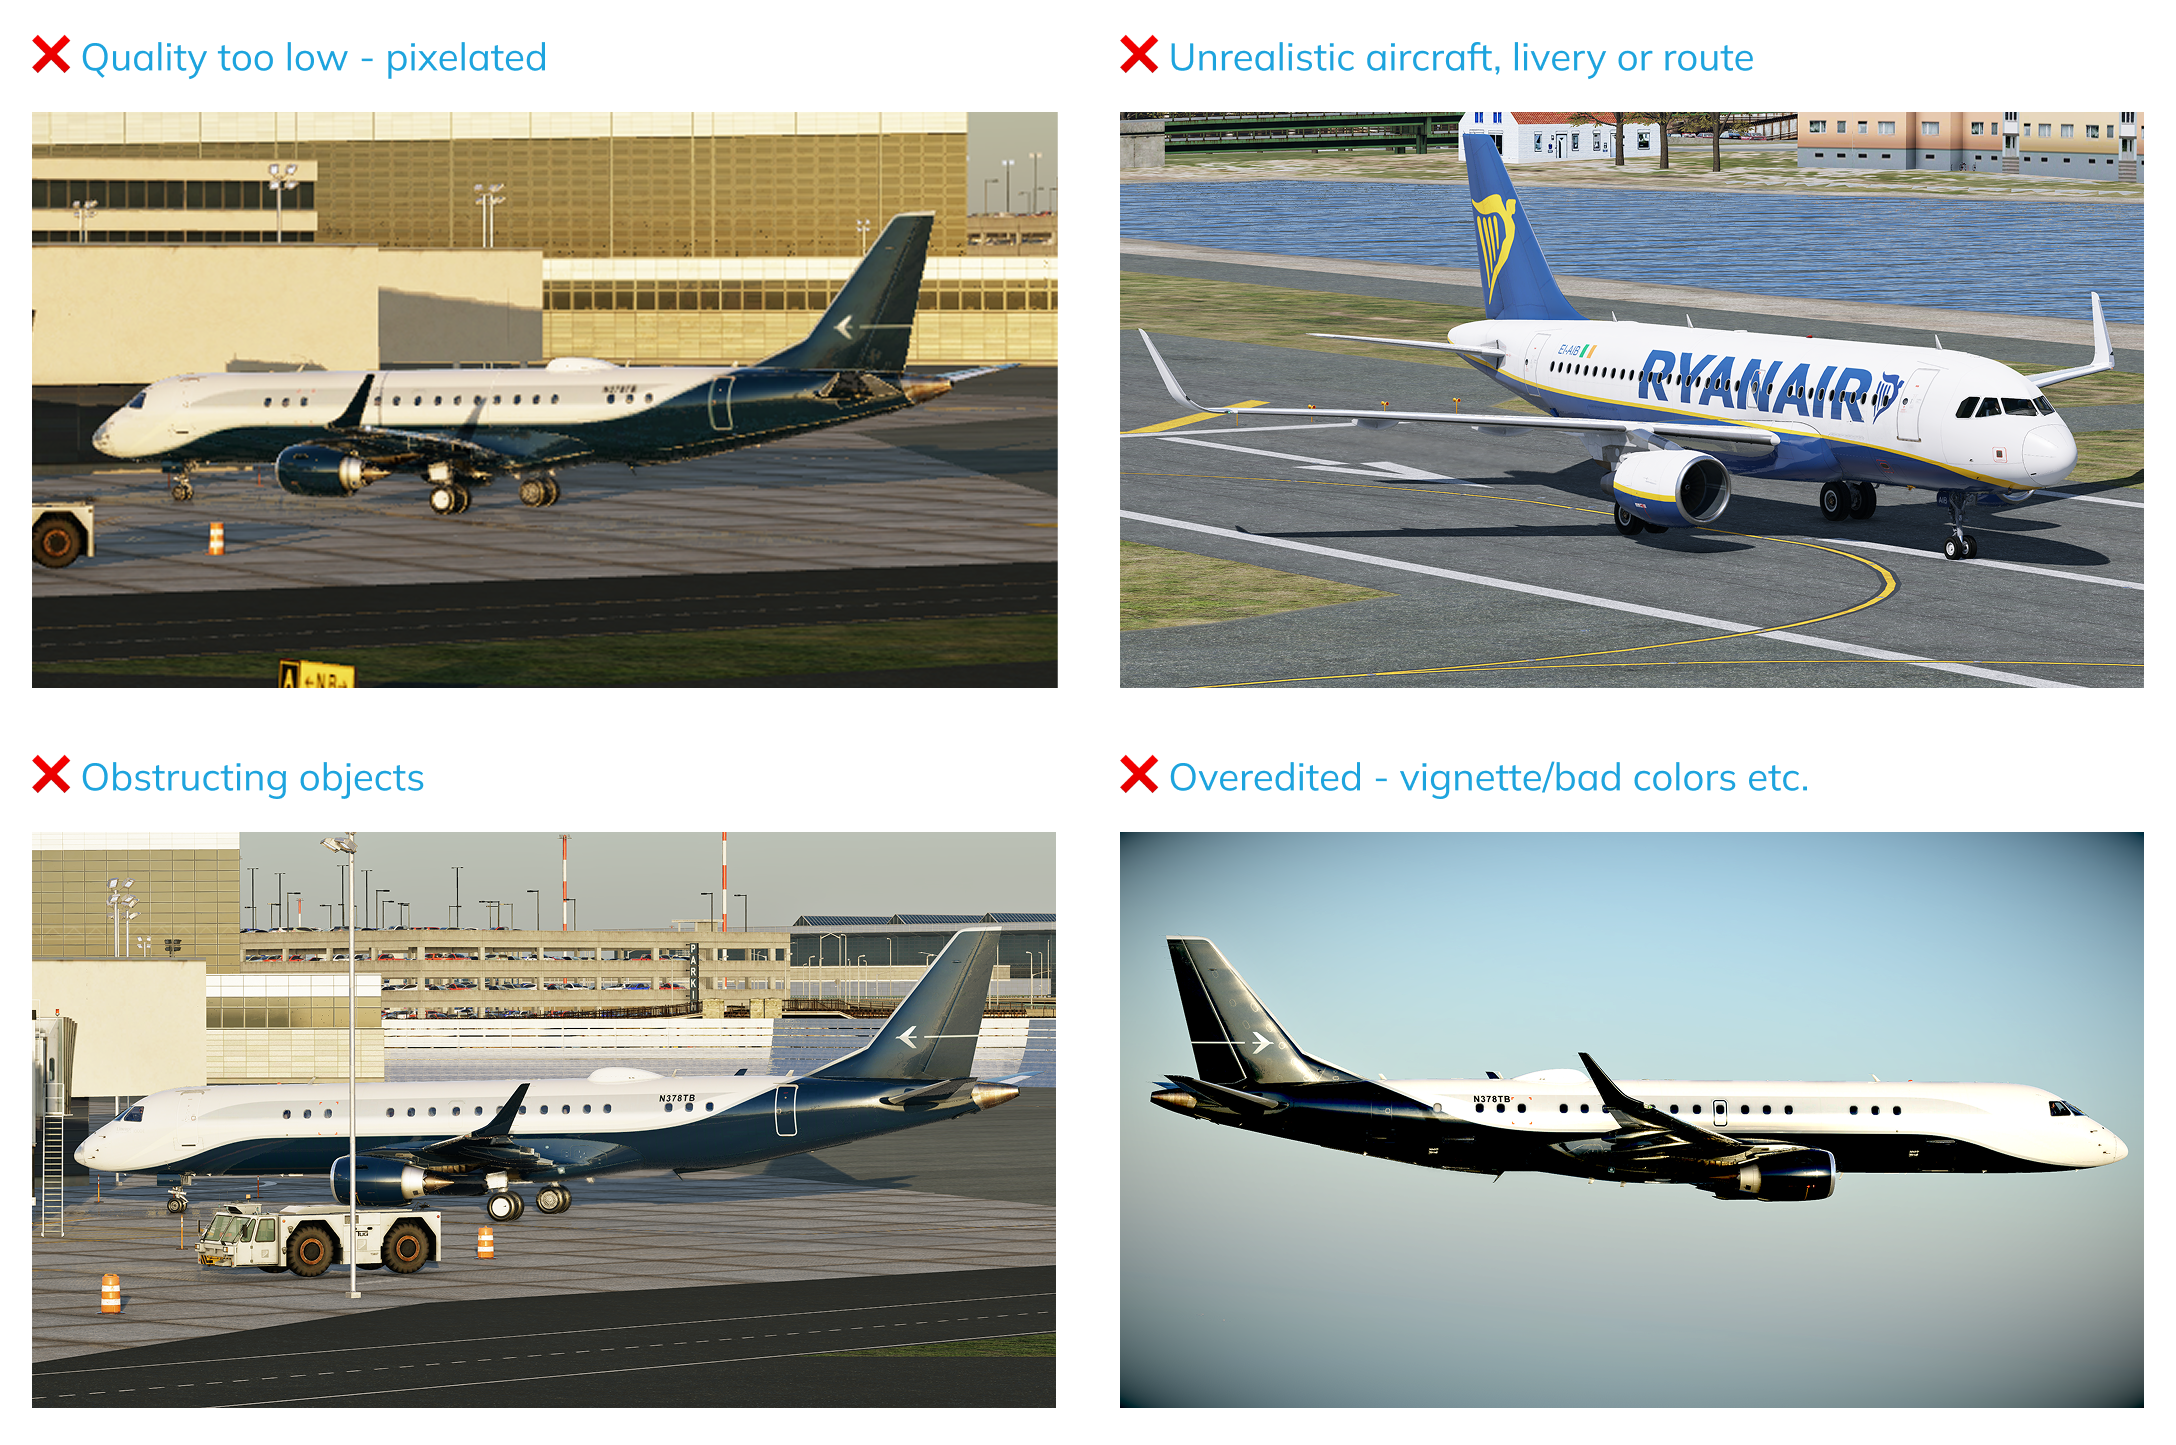
Miscellaneous possible rejection reasons
There are many other reasons your submission might get rejected. They include, but are not limited to:
- Objects obstructing the aircraft
- Overedited screenshot
- Quality being too low (pixeled graphics, textures, low-quality scenery or addon etc.)
- Unrealistic aircraft, livery or route - so no Ryanair A319 flying in the United States or anything! Fictional airlines, liveries or aircraft regs are not accepted at the moment
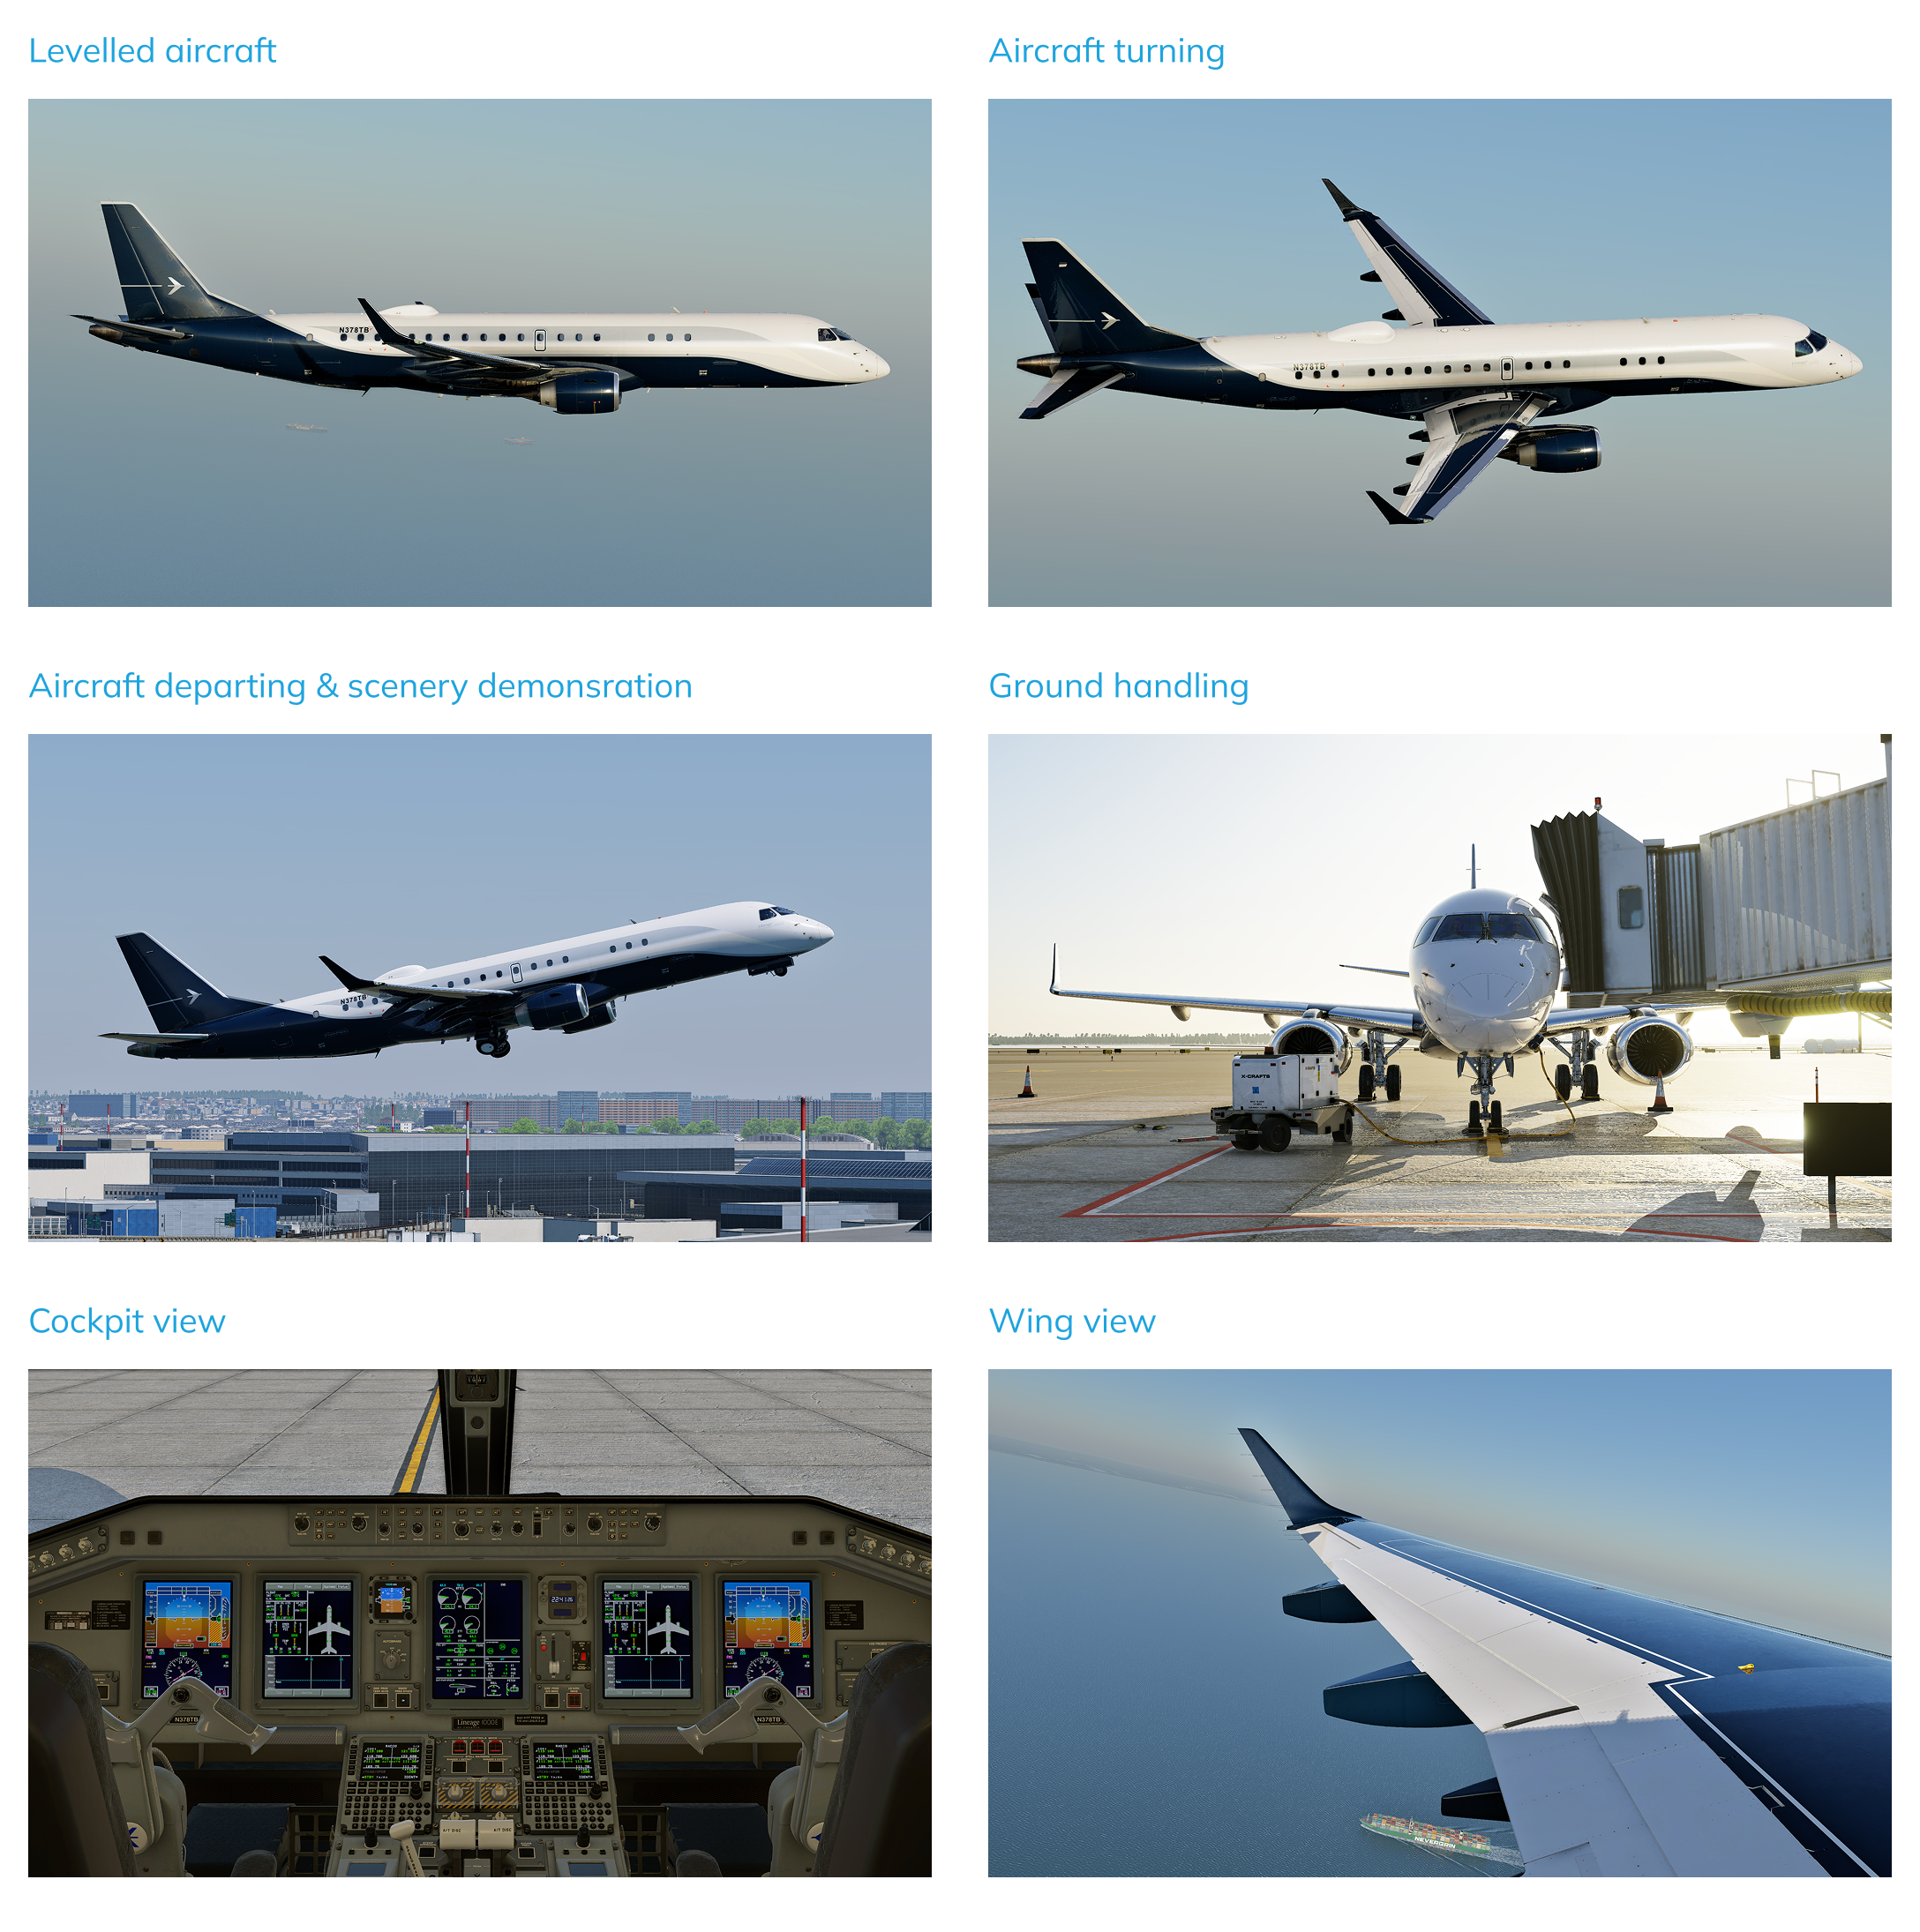
Possible screenshot composition examples
As an example, these are just a few of the possible angles you can take screenshots from:
Simulator-specific tips
Taking screenshots varies from sim to sim. Let’s break down how to do it in each of the major platforms.
Microsoft Flight Simulator
Microsoft Flight Simulator 2020 doesn’t have an internal “print screen” – you use Windows/Steam/game overlays instead:
- Windows Key + PrtScn: Captures the full desktop and saves a PNG to
C:\Users\<You>\Pictures\Screenshots. - Shift + Windows Key + S: Captures part of the screen to the clipboard using the Windows Snip & Sketch overlay, letting you draw a custom region, copy to clipboard or save to a custom folder.
- Windows Key + Alt + PrtScn: Uses the Xbox Game Bar to capture the active window. Saves to
C:\Users\<You>\Videos\Captures. - Steam (F12): If you run MSFS via Steam, press
F12to grab a screenshot. Steam will manage the image (View → Screenshots). - NVIDIA GeForce (Alt+F1): Press
Alt+F1if using NVIDIA’s GeForce Experience overlay. Saves by default to your Videos folder. - Xbox/Xbox Game Bar (controller): On Xbox consoles or using an Xbox controller on PC, press the Capture button.
Other tools (like AMD Radeon ReLive) may have their own hotkeys.
Where Screenshots Are Saved
- Windows + PrtScn:
C:\Users\<You>\Pictures\Screenshots - Windows + Alt + PrtScn (Game Bar):
C:\Users\<You>\Videos\Captures - Steam: Stored in your Steam user data folder (View → Screenshots → Show on Disk).
- GeForce Experience: Default is the Videos folder or as set in NVIDIA settings.
- Xbox/Xbox App: Saves to Xbox Captures gallery or Videos\Captures on PC.
MSFS itself does not manage screenshot saving — it's handled by your OS or external tools.
Entering Drone Camera
- Click the Camera icon on the toolbar and select Showcase (Drone).
- Or press the
Insertkey.
The Drone Camera automatically hides the HUD/UI for a clean view. Press Insert again to return to the cockpit.
Tip: Use Active Pause (
Pausekey) to freeze the aircraft while moving the camera around.
Moving the Drone
- Move/Translate:
W,A,S,D(forward/backward/left/right),R(up),F(down). - Rotate/Orient:
- Pitch up/down:
Numpad 8/2 - Yaw left/right:
Numpad 4/6 - Roll left/right:
Numpad 7/9
- Pitch up/down:
- Zoom:
Numpad +and– - Top-Down View:
Ctrl + Space - Follow/Lock to Plane: Press
Tab - Reset/Return: Press
Numpad 5or click Reset in the Drone UI - Toggle Aircraft Control: Press
C
Use the drone settings menu (hover top-center of the screen) or shortcuts:
- Translation Speed:
F1(decrease),F2(increase) - Rotation Speed:
F3(decrease),F4(increase) - Depth of Field (DOF):
F1toggles DOF on/off - Adjust DOF focus distance with
F2/F3 - Auto-Exposure/Auto-Focus:
Ctrl + F4toggles Auto Exposure,F4toggles Auto Focus - Foreground Blur: Press
F5to enable for artistic effects
Note: Zoom and camera speed can also be manually adjusted via the on-screen Drone Camera Settings panel.
Active Pause & Built-In Photo Tools
- Active Pause: Press the Pause key to freeze the aircraft (physics paused, weather/lighting continues).
- Set Pause On/Off: True full-sim pause can be keybound separately in the settings (not mapped by default).
Tip: Always hide HUD and map markers manually from the Assistance Options for the cleanest screenshots.
Microsoft Flight Simulator 2024 Photo Mode
MSFS2024 offers an awesome tool to take screenshots, which can be accessed from the toolbar at the top of your screen.
Screenshots taken with this tool will be saved to this location: C:\Users\%name%\AppData\Local\Packages\Microsoft.Limitless_8wekyb3d8bbwe\LocalState\Screenshot.
X-Plane
Taking a screenshot
- Hotkey:
Shift + Spacebar - Save Location: Screenshots are saved to the
X-Plane/Output/screenshotsfolder.
Controlling the camera
- Enter Free Camera Mode:
- Press
Cto toggle free camera mode. - If you want to fly your camera around relatively to the plane, you can use
Shift + 9in X-Plane 12 andShift + 4in X-Plane 11 - You can also move your camera inside the cabin
- Press
- Move the Camera:
- Arrow Keys (
←,↑,↓,→): Move left, up, down, or right. - Forward/Backward: Use
<and>(or,and.keys). - Speed Boost: Hold
Shiftwhile moving to increase camera speed.
- Arrow Keys (
- Adjust View:
- Rotate View: Hold the right mouse button and drag to look around.
- Zoom: Scroll the mouse wheel or press
+(zoom in) /-(zoom out).
X-Plane 12 screenshot tool
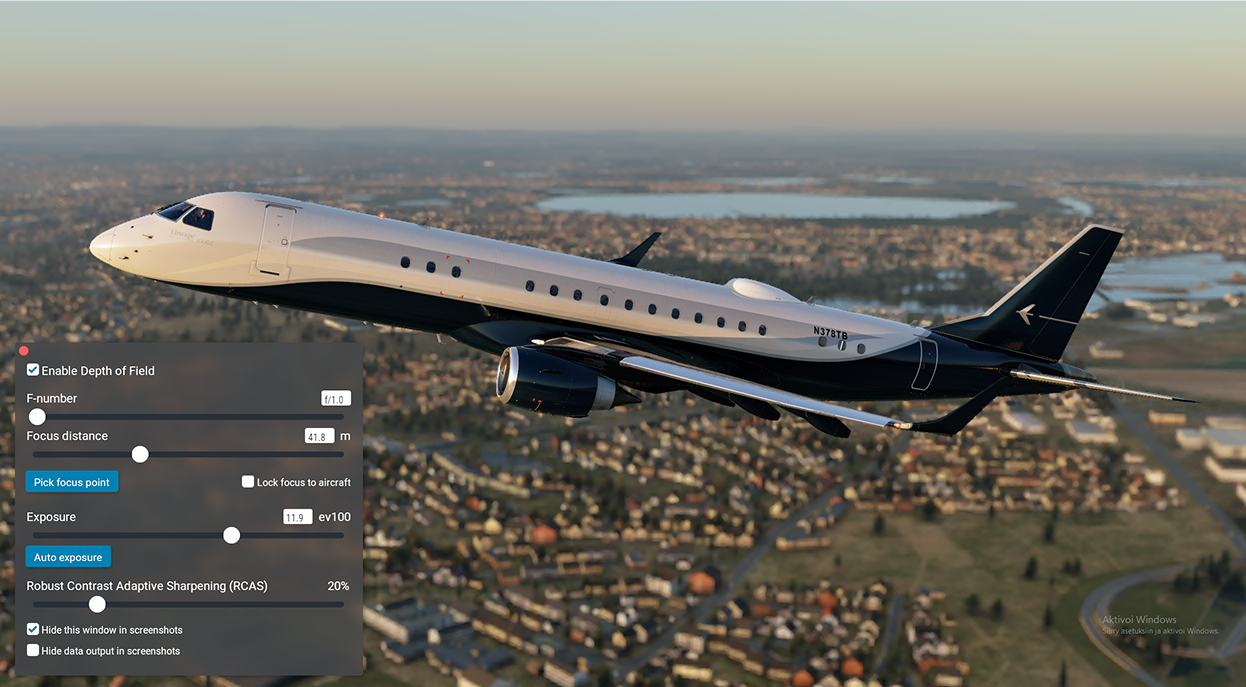
X-Plane 12 comes with an awesome built-in tool for making screenshots, which can be opened via View → Show screenshot controls option.
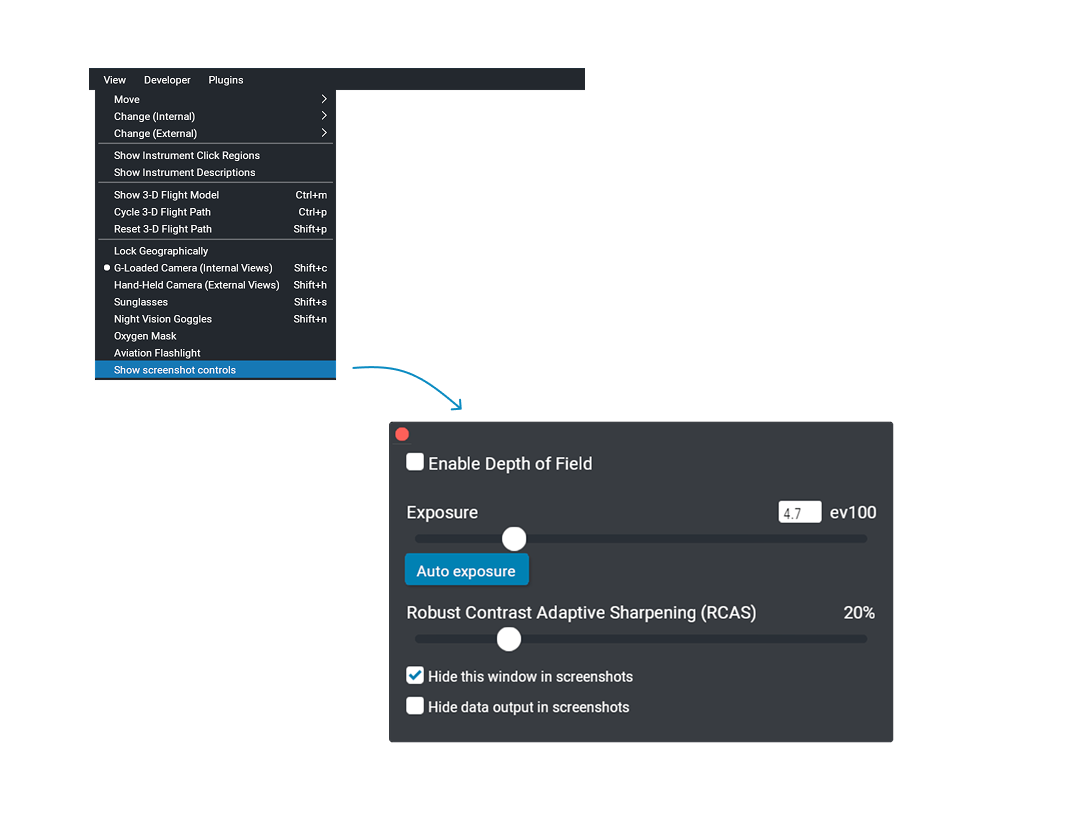
This tool is fantastic, as it gives you photographic-quality control over depth of field, focus point (or aircraft-locked focus), exposure (with auto mode), and adaptive sharpening, plus the option to hide the UI and data output overlays.
Prepar3D
- Built-in screenshot key: By default Press
Vto capture the screen (this is the “Capture Screenshot” command in Controls). If V doesn’t work, open Options→Controls, find Capture Screenshot, and bind it to a key. - Screenshot location: P3D saves screenshots to your Windows Pictures folder (e.g.
Pictures\Prepar3D v4 Filesorv5 Files). You can choose the format (BMP, JPG, or PNG) under Sim Menu → Options → Application → Screenshot Format. - File organization: By default you’ll find captures in
Documents\Pictures\Prepar3D vX Files.
Hiding UI and Labels
While Prepar3D's license watermark does not necessarily need to be cropped out of screenshots, it's important to remove any other text elements that may appear in the simulator, such as aircraft labels.
- Cockpit instruments & windows: Press
F10in 3D cockpit to toggle the 2D panel on/off. Close any pop-up windows manually (ATC, kneeboard, GPS, etc.). (Tip: In FSX/P3D the common shortcuts areShift+Ofor ATC,Shift+Kfor kneeboard,Shift+Pfor flight planner, but you can also just click each window’s close button or use the Views menu.) Ensure no toolbar or chat window is visible. - External labels: To turn off the red labels over other aircraft/vehicles, go to Options → Display → Traffic and uncheck Enable Aircraft Labels. This removes all callsign tags (and also ground vehicle labels) so your shots only show the models. You’ll no longer see any labels once disabled.
Infinite Flight
For optimal screenshot quality in Infinite Flight, always use the dedicated screenshot tool in replay mode rather than taking external screenshots of your device's screen. It is recommended to adjust your graphics settings to the highest possible quality at the moment of taking your screenshot. This ensures maximum resolution and graphics quality.
When using the Free Cameras (such as Free and Exterior/Interior Drone 1/2), the left side of the screen controls panning left/right and zooming, while the right side adjusts the direction the camera is facing.
Please avoid taking screenshots with ground textures from a low height, as ground textures are known to have bad quality. Screeners will be especially strict with Infinite Flight Screenshots due to lower graphics quality compared to other flightsims.
Final Thoughts
I hope this guide helps shed light on what makes a great SimPictures submission — and more importantly, inspires you to capture even more stunning screenshots. While technical quality and composition matter, the spirit of SimPictures has always been about passion for aviation and creativity in how you share it.
Thank you for being part of SimPictures. Your submissions, conversations, and feedback are what make this community thrive. We can’t wait to see where your creativity takes you next.
Happy flying and happy screenshotting!